'Varnish' Your Drupal Setup

For every high performance website that gets hammered by a decent traffic volume, some sort of caching mechanism is essential and Drupal is no exception. The Drupal caching approach, to a great extent, depends upon the type of visitors who frequent the website and this suggests different Drupal specific caching techniques depending upon the type of visitors to the website; for instance if the predominant visitors to the website are authenticated users versus unauthenticated. So in this blog, I’d like to discuss Varnish as a caching option for public and "portal"-like sites where users log in to participate. A sample architecture of an enterprise Drupal website might have multiple, load-balanced , front-end Apache servers proxying requests to various "middle-tier" Drupal servers. Nothing is wrong with this setup when caching is applied somewhere on the Drupal servers, with the use of modules such as Memcache, APC, Boost, etc. However, we can improve this architecture by introducing Varnish to replace the front-end Apache server , providing an alternative caching architecture. In its simplest terms, Varnish is a reverse proxy in-memory caching mechanism that sits in front of the Drupal box. Varnish serves the HTTP requests by attempting to fetch the response from memory; if the response hasn’t already been cached, Varnish proxies the request to Apache, serves the response, and caches it in memory for subsequent hits. So in essence, Varnish caches the PHP code as well as static code. The first step is to install Varnish software, and this page outlines that in detail. Configuring the Drupal site to use Varnish is straightforward. The next step is to configure your site’s VCL (Varnish Configuration Language) which is a JavaScript like language that tells Varnish what URLs to cache and what not to cache. For instance, we would want to disable caching: (a) when the user is logged-in and administering the site or (b) when there is a Drupal session cookie or (c) when there is an AJAX request. In addition to these caching "rules", we need to define the host and port for the Drupal server in the site's VCL file: # Drupal host .host = "yourDrupalBox"; .port = "8080"; # Do not cache these paths req.url ~ "^/status\.php$" || req.url ~ "^/update\.php$" || req.url ~ "^/admin$" || req.url ~ "^/admin/.*$" || req.url ~ "^/flag/.*$" || req.url ~ "^.*/ajax/.*$") # Remove all cookies that Drupal doesn't need to know about. set req.http.Cookie = regsuball(req.http.Cookie, ";(SESS[a-z0-9]+|SSESS[a-z0-9]+|NO_CACHE)=", "; \1="); Once Varnish is set up, the next step is to install the Drupal Varnish Accelerator Integration module to configure our Drupal install to work with our Varnish install and define:
- The machine name and admin port where Varnish is listening on
- How often to flush the Varnish cache
- The control key from /etc/varnish/secret from the Varnish box
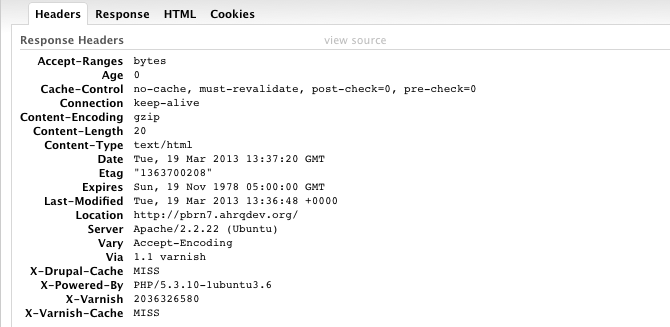
Next, in the Drupal settings.php file we need to add a few parameters as well: conf['reverse_proxy'] = TRUE; conf['reverse_proxy_addresses'] = array('ip address for the Varnish host'); conf['cache_backends'] = array('sites/all/modules/contrib/varnish/varnish.cache.inc'); conf['cache_class_cache_page'] = 'VarnishCache'; $conf['page_cache_invoke_hooks'] = FALSE; To ensure that Varnish is properly configured and is actually serving the website pages' from its cache, we can just examine the response header in Firebug in Firefox or Developer Tools in Chrome. Note that upon first hitting a page that hasn't been cached before in Varnish or the page cache threshold has already expired, then "X-Varnish-Cache" registers "MISS".
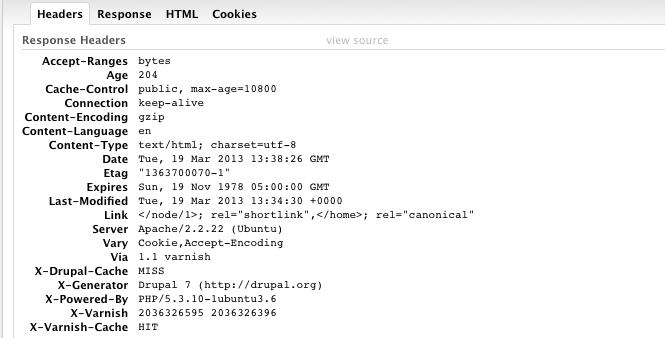
Upon subsequently hitting the same page, Varnish should have already cached the page in memory and "X-Varnish-Cache" would register a "HIT".
As you can see, the cache hit at Varnish offloads the drupal server altogether, and any down-stream caching is unused for this page. So if your website is using an alternative caching mechanism beside Varnish, then give Varnish a spin in your development environment and see how it works for you Drupal site.
- Log in to post comments


